comment 0

Arepas

I had a goal of posting two new recipes on Chompzone a month. I succeeded in January, fell flat and February and now it’s almost the end of March! Yikes! But this one is a goody.

A few weeks ago my dad took me to a Venezuelan restaurant in Philadelphia that is famous for its hot chocolate and being gluten free. The hot chocolate was amazing (you eat it with a spoon!) but it was the arepas that won me over. How have I never had an arepa?! I looked up where you can get them in Boston and it was Jamaica Plain or other parts of the city that I rarely frequent.

And so I thought.. how hard can it really be to make these? So I decided to look up a few recipes and realized… this is really easy. And when I discovered we didn’t have cheddar cheese (which James and I are convinced we both bought last week… so its somewhere in our house!), I thought I’d make use of the chicken leg and thighs that had been cooking in my crockpot all day. Thus, a recipe was born.

Here’s what you need:

Arepas 

  • 2 cups of precooked corn flour (note – you buy this, don’t cook corn flour! I found it fairly inexpensively at the Shaws near me – it’s also on Amazon)
  • 1 – 2 tsp salt (I used 2 but could have gotten away with less)
  • 2 1/2 cups warm water
  • 2 – 4 tbsp oil of your choice (I used canola, but you could use olive, corn, vegetable, etc.)

Mix the corn flour and salt together in a large mixing bowl. Make a well in the center and add the warm water. Mix until everything is incorporated. Let rest for 5 minutes.

Divide the dough into 8 even balls. Flatten to about 1/2-inch discs each. In a large frying pan (with lid), head 2 tbsp of oil on medium (if you’re using cast iron I am imagining you can get away with less oil). Add four of the corn patties and cover. Cook on medium heat for 6 -8 minutes.

Remove cover, flip and cook uncovered for another 6 – 8 minutes. Remove and let cool on a wire rack (put paper towels underneath to catch oil drips).

Add 2 more tbsp of oil and add the remaining patties. Cover and repeat the cooking process.

Filling

The beautiful thing about arepas is that you could fill them with about anything. I had been cooking a whole bunch of chicken thighs and legs in the crockpot, and a recipe was born. I looked at a few other chicken arepa recipes for inspiration, and got to work. Here’s what you need:

  • 2 chicken thighs and 2 chicken legs, cooked, shredded (bones and skin discarded)
  • 1/2 onion, chopped finely
  • 1 small zucchini, chopped finely
  • 1/4 tsp red pepper flakes
  • 1/2 tsp dried cilantro (or 1 – 2 tbsp fresh, leaves only, chopped)
  • 2 tbsp mayonnaise
  • 1 avocado, diced
  • 1/2 lime

Shred your meat and set aside. In a small frying pan, cook the onion on medium heat (use a small amount of oil or Pam to keep it from sticking), then add the zucchini. Add the red pepper flakes and cilantro (if using fresh, hold until the end).

Add onions and zucchini to the chicken. Add the diced avocado and mayonnaise. Mix until combined.

Squeeze the juice of half of a lime and mix to incorporate. Add fresh cilantro if using. Salt and pepper to your taste.

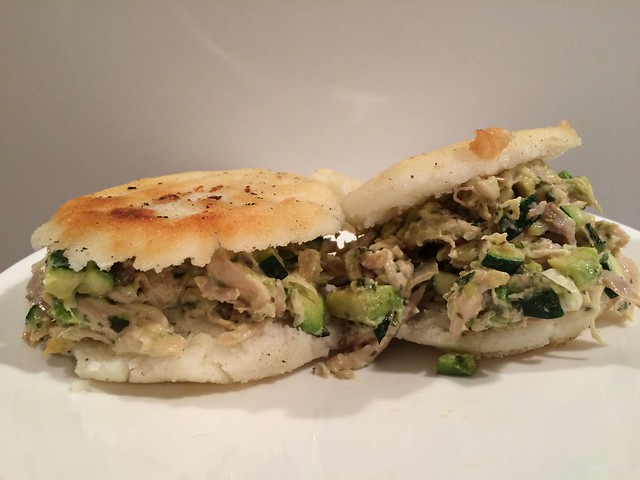
Cut the arepas in half (like a hamburger bun) and fill with chicken salad. Place top back on and enjoy!

comment 0

Kung Pao Brussels Sprouts

It snowed a lot. So much. It’s still snowing and we’ve already had more than 20 inches of snow. Everything is closed. Roads, grocery stores, the gym, my yoga studio… you name it. All of my protein is frozen and I didn’t feel like eating leftover beef stew again.

And then popped up a recipe from Bon Appetit for Kung Pao Brussels sprouts. I had, for once, a bag of Brussels sprouts in the fridge and a pot of already cooked rice in the fridge. It was perfect – except for one thing – the recipe was going to be WAY TOO HOT. So I modified it.

Here’s what you need –

  • 16 ounces of brussels sprouts, trimmed and cut in half
  • 2 tbsp sesame oil
  • 1 tbsp corn starch
  • 1 tsp Sriracha
  • 1/4 cup tamari
  • 2 tsp apple cider vinegar
  • 1 tbsp minced garlic
  • 1/2 tsp ground ginger
  • 1 tbsp sugar
  • crushed peanuts, optional

Preheat the oven to 425 F. Cut the brussels sprouts in half and spread on a cookie sheet. Drizzle with 1 tbsp of the sesame oil. Sprinkle salt. Pop in the oven for 10 – 15 minutes, until starting to brown and slightly softened.

While the sprouts are cooking, mix the cornstarch with 1 tbsp of water.

In a small sauce pan, add the other tablespoon of sesame oil and heat on medium. Add the garlic and ginger. Cook for 1 – 2 minutes. Add the Sriracha and cook for another minute, stirring occasionally.

Add the tamari, vinegar, sugar and 1/3 cup of water. Bring to a boil then reduce heat and add the corn starch slurry. Mix and cook for another minute until thickened. Remove from the heat.

Remove the brussels sprouts from the oven and transfer to a bowl. Add the sauce and crushed peanuts.

comment 0

Spanish Rice

I decided, per usual, not to make any New Year’s resolutions. Rather, James and I created a bucket list for 2015 – with achievable goals that included traveling, saving money (those seem to oppose each other, don’t they?) and updating this blog more often (for James, writing more songs). And now it’s already 25 days into the month and I have yet to post anything!

I would like to blame that on making big batches of previously created recipes (including my pumpkin pork stew, pasta sauce and chili). That’s part of the problem, but also eating out and not recording any recipe creation is really the culprit. Like the gluten free buckwheat biscuits eggs benedict with vegan hollandaise sauce. Why didn’t I record as I went? Why didn’t I take any decent photographs? Who knows. Probably hunger.

Anyway – I thought I would finally take the opportunity to present one of my easier, rice cooker dishes – as the recipe I came up with recently was superb, and this is something I do dearly miss since going back on the GF wagon (now three years ago!).

Here’s what you need –
  • 4 cup rice cooker
  • 1 1/2 cups rice
  • 1 1/2 cups water
  • 1- 28 ounce can of crushed or diced tomatoes
  • 1 pepper, chopped finely
  • 1 onion, chopped finely
  • 1/2 tbsp chili powder
  • 1 tbsp olive oil
In a large frying pan, heat the olive oil on high. Add in your chopped peppers and onions, reduce heat to medium, and let cook for 4 – 5 minutes, stirring occasionally. Remove from heat.In the rice cooker, combine the rice, water, tomatoes, cooked peppers and onions and chili pepper. Mix to combine, then cover. Cook using rice cooker directions (I simply pushed the brown rice button and walked away).

Once done, fluff with a fork. Add a can of black beans (optional) and serve on top of baby kale (also optional) and if you’re feeling fancy, top with shredded cheddar.

comment 0

Bacon Sage Scallops

I’ve never cooked scallops before – though for much of my culinary “career” I was scallop adverse – having once ate them at approximately the same time I developed the flu. This is a very bad combination and one that will scar you for life. Flash forward to two years ago and I decided to give scallops a go again (in fact, on the evening that James proposed!). And then Puritan & Company opened, and I had more scallops. And more and more and more. Cured.

Which brings me back to never cooking scallops before. I needed some help, and turned to Alton Brown for advice and support. Plus, any recipe with 150+ five star reviews (and nothing but!) is a sure thing.

I had to make this my own though (of course!) and use up some ingredients in the fridge (like bacon and sage). It was easy, delicious and considerably more affordable than anything I would get at a restaurant.

Here’s what you need:

  • 1 pound of fresh sea scallops, side muscle removed, rinsed and patted dry
  • 4 strips of bacon, chopped into 1/2″ pieces
  • 2 tbsp unsalted butter (divided in half) — alternatively use olive oil for a dairy free version
  • 1 tbsp olive oil
  • 1 tbsp fresh sage, chopped
  • 1 bunch of asparagus, ends trimmed and cut into 1 – 2″ pieces
  • Spaghetti squash, pasta or risotto (whatever you choose as a vehicle to serve – or nothing at all if you want to sit and eat a pound of scallops by yourself)
  • Salt and pepper to taste

This is a recipe that I recommend preparing all of your ingredients (as described above) in advance so that you can move quickly.

In a large frying pan on high heat, add 1 tbsp of butter and 1 tbsp of olive oil. Add your trimmed and chopped asparagus. Cook for 3 – 4 minutes, stirring occasionally. Remove from heat.

Rinse the scallops, remove the side muscle and pat dry. Lightly salt and pepper.

Heat a large pan on high, add 1 tbsp of butter and melt. Once melted, add the chopped bacon and lower heat to medium. Cook until crispy (about 3 – 4 minutes), stirring occasionally. Remove bacon and let cool on a paper towel. Leave bacon fat in the pan.

With the pan still on medium heat, add chopped sage to the bacon fat and cook for 1 minute. Stir occasionally. Add scallops. Ensure that the scallops do not touch. Cook for 1 1/2 – 2 minutes, then using a pair of tongs, flip over. Your scallops should have a nice crust/browning on the side that was heat down. Cook the scallops for another 1 1/2 – 2 minutes, then remove from the heat.

Serve scallops on top of spaghetti squash, pasta, risotto, etc. with asparagus. Spoon over some of the fat and sage in the pan. Sprinkle with cooked bacon bits.

comment 0

Prosciutto, fig and goat cheese pasta

It’s been a year. I know, I know. That’s not great. But I have a very valid reason – a few in fact. In November 2013, my mom had a health scare that eventually led to very serious surgery in February. My brother and I dropped everything to take care of her – and quite honestly, I ate whatever was available, when I could. Flash forward to the summer and I was launched into wedding preparation, something else that went on a mini hiatus for the first half of 2014. Then I got married, went on my honeymoon and have finally started to get back “in the swing of things.”

And then… I lost motivation to make anything new. It was a strange feeling. Until tonight. James wanted a fig, prosciutto and goat cheese sandwich this weekend. Unfortunately, we couldn’t find a sandwich shop to make said treat. And so an idea was born.

Fig, prosciutto, goat cheese PASTA. And oh my – this was incredible pasta. It was creamy, and well balanced, and delicious. It was entirely made up as I went, and gluten free to boot (though this could be made with any type of pasta with marvelous results).

Here’s what you need:

  • 1 pound of spaghetti (I used Trader Joe’s gluten free quinoa spaghetti)
  • 1 small onion, sliced thinly
  • 1 – 2 tbsp olive oil
  • 1/2 tbsp sugar
  • 6 dried black mission figs, chopped
  • 4 oz. prosciutto, torn into pieces
  • 2 tbsp of fresh sage, finely chopped
  • 2 tbsp red wine (I used pinot noir – but any  light red wine will do)
  • Goat cheese to taste

To start, bring salted water to a boil for the pasta. Add pasta and cook according to manufacturer’s instructions.

While your water is boiling, thinly slice the onion. Heat 1 – 2 tbsp of olive oil on high in a large frying pan and add onions. Lower heat to medium and cook for 3 – 4 minutes. Sprinkle sugar over onions, stir occasionally for another 1 – 2 minutes. Transfer onions to a separate container.

Chop the dried figs into 1/4″ pieces. I removed the stems, sliced in half lengthwise, then chopped across a few times. Heat the pan you cooked the onions in again and add the figs. There should be leftover olive oil in it.

Tear prosciutto into the pan with the figs. Occasionally stir in between tearing. After all of the prosciutto is torn up and in the pan, add 2 tbsp of red wine and stir.  Lower heat to low. Let wine evaporate (1 – 2 minutes), then add your finely chopped sage. Add the onions back in and stir to combine.

At this point, your pasta will most likely be cooked. Strain and add to the pan with your figs. Turn off the heat, and stir to combine everything.

Top with crumbled goat cheese. Enjoy!


comment 0

Pumpkin Pork Stew

The majority of October I was out sick. This meant a lot of working from home with the Today Show on in the background. During the Kathy Lee and Hoda portion of the Today Show (which is usually on mute, because that is very painful to watch), I happened to catch a glimpse of a cooking segment featuring pumpkin chili. As a lover of all things pumpkin, this is not something one can forget so easily. And so as I am finally back in action, three weeks later, I decided I must implement some sort of pumpkin stew recipe. And here my friends, you have it.

This might be one of the best things I’ve ever made.

Here’s what you need:

  • 3 lbs (approximately) of pork tenderloin, cut into 1-inch cubes
  • 12 ounces of gluten free beer (I grabbed a 6-packed at Trader Joe’s)
  • 1 tsp salt
  • 2 cans of green chilis
  • 3 tsp oregano (divided)
  • 1 15 ounce can of pumpkin
  • 1/2 cup of light sour cream or Greek yogurt
  • 1/4 cup olive oil
  • 2 medium tomatoes, diced
  • 2 onions, diced
  • 2 tbsp chili powder
  • 4 cloves of garlic, diced
  • 4 cups of kale, torn into small pieces with stems removed

Chop your pork into cubes. In a large pot, combine pork, beer, 3 cups of water, salt and half of the oregano (1 1/2 tsp). Bring to a simmer, removing some of the foam. Once  a simmer has started, add in the two cans of chilis, lower the heat to medium and cover. Let simmer for 30 minutes.

Add two tablespoons of the canned pumpkin to the 1/2 cup of sour cream. Mix together, cover and stick in the fridge.

While your pork cubes are cooking, chop the onions and tomatoes. Heat the olive oil and add the onions and tomatoes. Lower the heat to medium and let cook for 15 minutes, until onions are translucent. Add the chili powder, the rest of the oregano and garlic. Cook another 5 minutes. Add the pumpkin and cook for another 5 minutes. Stir occasionally.

Add the pumpkin and tomato mixture to the pork. Uncover and let simmer for 30 minutes, stirring occasionally. Add the kale, stir in and let cook for another 10 minutes.

Let sit for 10 – 15 minutes before serving. Ladle into bowls, add the pumpkin cream and sprinkle with salt and paprika or chili powder.

comment 0

Gluten Free Cinnamon Buns

I don’t know about you, but I love cinnamon buns. It’s not something that one regularly gets to eat being gluten free, and unfortunately I have never found the perfect replacement. I made these paleo treats last year and while they were good (and I mean really good), they weren’t exactly what I was looking for.

Then I decided this morning, because it was slightly cooler outside, and I woke up at 5:30 am (ugh), that  I would give the cinnamon buns another whirl. I didn’t spend hours looking for the perfect recipe, I just grabbed my BabyCakes cookbook from the shelf and opened to the Wonder Buns recipe.

I was skeptical. Only 20 minutes in the fridge? This is really going to roll up in a log and hold together? Let me tell you… it does and wow. This is exactly what I’ve been looking for!

Here’s what you need:

  • 1 1/4 cup Bob’s Red Mill All-Purpose GF baking flour
  • 1/2 cup brown rice flour + extra for dusting
  • 1/4 cup arrowroot
  • 1 3/4 tsp xanthan gum
  • 1 tbsp baking powder
  • 1 tbsp cinnamon
  • 1/4 cup melted coconut oil
  • 1/3 cup agave nectar
  • 3 tbsp vanilla extract
  • 1 cup of warm water (NOTE: you will not need this all)

Combine the all purpose GF flour, brown rice flour, arrowroot, xantham gum, baking powder and cinnamon in a bowl. Add coconut oil, agave and vanilla. Stir with a rubber spatula until the dough resembles a course sticky crumble. Slowly add the warm water to the dough, stirring between intervals until you have a ball that is slightly sticky. I only ended up using a 1/2 cup.

Cover the dough with plastic wrap and pop into the fridge for 20 minutes. Preheat your oven for 325 F. Line two baking sheets with parchment paper.

Tear off a large piece of wax paper and sprinkle it with brown rice flour to prevent sticking. Remove the dough from the fridge and form a lumpy sort of rectangle and place on the wax paper. Sprinkle more brown rice flour on top and begin rolling it out into a rectangle that is 1/2″ thick.

Now it’s time to fill! Here’s what you need:

  • 1/4 cup melted coconut oil (split in half)
  • 1/2 cup agave nectar
  • 3 tbsp. cinnamon
  • 1/4 – 1/2 raisins (optional)

Brush half of the melted coconut oil onto the rolled out dough. Then combine the agave and cinnamon in a separate bowl (this takes a few minutes to come together). Spread on top of the dough, then sprinkle the raisins on top. Carefully, using the wax paper and a spatula to help you along the way, roll the dough from the short end until you have a 12″ log.

With a sharp knife, cut roll in half and then each half into 6 equal pieces. Place 6 buns on each baking sheet and put into the oven for 12 minutes. After the first round of cooking, remove and brush the remaining coconut oil on top of the buns. Put back in the oven for 4 – 5 minutes, but remember to reverse the pans.

Remove and let sit for ten minutes. Then combine 1/2 cup of powdered sugar with 1 tbsp of vanilla almond milk. Drizzle on top of the buns. Inhale.

comment 0

Gluten free grilled flatbread pizza

Did I tell you? I gave up cheese. Cheese! I do eat a little goat cheese and fat free feta, but otherwise everything else is cut out. I had a serious cheese problem. Ask James. He would tell you I spent at least $25 a week on fancy cheeses, shredded cheese and sliced cheese. I ate it as dessert. I ate it with every meal. I ate it when I was bored, hungry, tired… Cheese was my savior. And then after consuming a huge plate of cheese, I had a realization – this isn’t making me feel any better.

So I gave up cheese. I feel amazing. I miss it, yes, but that’s why I’m allowed the random moments of goat cheese crumbles and feta. Neither of which you can find on a gluten free pizza anywhere in town. And as I mentioned in a previous post, it’s too hot to turn the oven on. I wanted to make pizza on the grill, but how can one do that with gluten free pizza dough?! Oh, I will tell you.

To avoid massive heat, you can use a toaster oven for the first part. If not, make your crust in the morning when the heat won’t overcome the household.

I used a recipe adapted from Gluten Free on a Shoestring. Apparently you can make pita pockets from this too!

Here’s what you need –

  • 2 cups gluten free flour blend (I used BetterBatter)
  • 1 tsp xantham gum (omit if your blend has it already)
  • 1 1/2 tsp baking powder
  • 1 tsp salt
  • 1 tbsp vegetable oil
  • 1 egg + 1 egg white (I used egg whites from the carton for this)
  • 1/4 cup 2% milk
  • 1/2 cup warm water (possibly more if dough is crumbly)

Preheat your oven to 400 F. Mix the flour blend, xantham gum, baking power and salt in a stand mixer. Add the oil, eggs and milk and mix to combine. I used the paddle attachment for this.

For the water, add slowly while the mixer is still on and stop once a ball comes together and the dough is not overly sticky. Remove from mixer and divide dough into 3 equal portions. Oil a pizza stone (or a smaller tray for your toaster oven). For each dough portion, wet your hands and smooth down so that it’s 1/4 – 1/2 inch thick.

Bake for 8 minutes, flip, and bake for another 8 minutes. Let cool.

For the pizza part of this, when you’re ready, add your toppings. In my case, I made caramelized onions and figs, shredded prosciutto and sprinkled goat cheese crumbles on top. Preheat your grill and oil the grate. Slide your topped pizza carefully onto the grill, and close. Let cook for 5 – 7 minutes, until everything is heated through and your crust has grill marks.

I added a balsamic drizzle on mine to finish it off.

comment 0

Cantaloupe & Prosciutto Risotto

I know. It’s been a long time. I have been going through a lull. I don’t want to cook anything new. It’s hot outside so turning on the oven is impractical. Telling you how to grill a hamburger is silly. But I had a dream that I made cantaloupe & prosciutto risotto and I couldn’t get it out of my mind.

It was fate. I had to cook again! This turned out to be surprisingly delicious, but a little heavy for a summer dish. In retrospect, I would also add more prosciutto to bump up the salt factor and swap out the vegetable broth for chicken. But overall, it was pretty amazing.

Recipe adapted from Bon Appetit.

What you need –

  • 1 onion, chopped finely
  • 1/2 ripe cantaloupe, grated
  • 3 tbsp olive oil
  • 1 clove of garlic, chopped
  • 2 cups arborio rice
  • 1/2 cup white wine
  • 4 cups vegetable broth + 1 cup water
  • 2 ounces prosciutto ripped into small pieces

You may be asking, how the hell do I grate a cantaloupe? I know. I wouldn’t want to either. So this recipe works best if you have a food processor and access to the right blade. Alternatively, if you don’t have a food processor, I recommend removing the seeds and rind from half a cantaloupe and blending it in batches. The end result doesn’t have any distinguishable pieces of cantaloupe in it so you won’t be missing much.

First thing first, as with all risottos, bring your broth (and in this case broth + water) in a medium size saucepan to a simmer.

Prep the onion, garlic and cantaloupe. Heat olive oil in a large saucepan and add the onion, cooking for two minutes. Add the garlic and stir for 30 seconds, then add the cantaloupe. Stir frequently until the liquid thickens up (takes two to three minutes). Add your arborio rice, stir and let soak in the goodness for about a minute. Add the wine, continuing to stir until absorbed.

Then add the broth by 1/2 cupfuls, stirring frequently until the broth has been absorbed. Do this until you’ve used up all the broth and the rice is tender. Remove from the heat and add your prosciutto. Let sit for at least 10 minutes before serving.

comment 0

Smoothie Heaven

For the past month I’ve been making smoothies for breakfast. This isn’t anything totally new in my routine, but up until very recently I was super reliant on protein powder. This is great when you’re in a pinch for a FAST high protein meal, but let’s face it, it’s not very natural, full of sugar and fillers and calories. So I wanted to try something new, something healthier and more natural.

Meet: the Spinach Breakfast Smoothie Family

I don’t have photographs of these bad boys because lets face it, I make them at night, pour into a cup, and they look rather green and brown by the next day. But I swear, these are tasty treats and I truly believe it’s helped me lose a little weight, or at least bloat. Here are my favorites:

Chocolate Banana Smoothie

  • 1 1/4 cup unsweetened vanilla almond milk
  • 1 banana
  • 1 Tbsp Dutch Processed Cocoa powder
  • 1 tsp chia seeds
  • 1 – 2 handfuls baby spinach

Combine all ingredients together in a blender and blend until smooth.

Peanut Butter & Jelly Smoothie

  • 1 1/4 cup unsweetened vanilla almond milk
  • 1 banana
  • 1/2 cup strawberries, hulled
  • 1 Tbsp PB2 peanut butter powder
  • 1 tsp chia seeds
  • 1 – 2 handfuls baby spinach

Combine all ingredients together in a blender and blend until smooth.

Tropical Joy Smoothie

  • 1 1/4 cup unsweetened vanilla almond milk
  • 1 banana
  • 1/4 cup strawberries, hulled
  • 1/3 cup frozen mango chunks
  • 1 tsp chia seeds
  • 1 – 2 handfuls baby spinach

Combine all ingredients together in a blender and blend until smooth.

Chocolate Covered Cherry Smoothie

  • 1 1/4 cup unsweetened vanilla almond milk
  • 1 banana
  • 1 Tbsp Dutch Processed Cocoa powder
  • 1/2 cup frozen cherries
  • 1 tsp chia seeds
  • 1 – 2 handfuls baby spinach

Combine all ingredients together in a blender and blend until smooth.

Coffee Boost Smoothie

  • 1 cup unsweetened vanilla almond milk
  • 1/2 cup strong coffee or two shots of espresso, cooled
  • 1 banana
  • 1 Tbsp Dutch Processed Cocoa powder
  • 1 tsp chia seeds
  • 1 – 2 handfuls baby spinach

Combine all ingredients together in a blender and blend until smooth.