comment 1

Raw Oreos

Eating at gatherings oftentimes means bringing your own food. It’s just the nature that goes with the GF beast. So for a St. Patrick’s Day feast at a friends, I brought my own shamrock inspired GF pizza and probably the healthiest dessert I’ve ever made. But they were delicious, and I don’t care what anyone says!

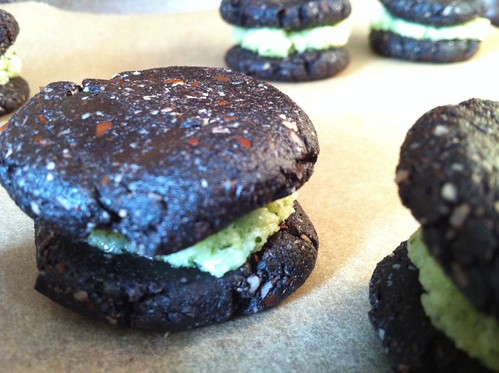
I bring you gluten free, paleo, sugar free, egg free, no bake Oreos! Here’s what you need –

For the cookie

  • 1 1/2 cups almond meal (I used Trader Joe’s)
  • 1/2 cup cocoa (King Arthur’s Dutch Processed)
  • 1/4 cup agave
  • 1/2 tsp vanilla extract
  • 1/4 tsp salt

In a food processor, or in a large bowl, combine the almond meal, cocoa and salt together. Add the agave and vanilla and mix well until a ball forms.

For a no mess, easy clean up, line a cookie sheet with parchment or wax paper. Roll 1-inch balls, then gently flatten. You need sets of two so if you have any leftovers, eat it! Place the flattened balls on the cookie sheet and pop into the fridge while you make the filling.


For the fillings

  • 1 cup shredded coconut
  • 2 tbsp coconut oil
  • 1 – 2 tbsp agave
  • 6 – 8 mint leaves (optional, but this was St. Patrick’s Day!)

In a food processor (yes you really need one now), combine the above ingredients until a butter / paste forms. Using a butter knife, spread about 1 tsp on each cookie, then press cookies together, frosting side in the middle.

comment 1

Easy Goat Cheese Alfredo Sauce

My goodness, has it really been two months?! A lot has happened. James proposed. We’re planning a wedding. I’ve watched almost three seasons of Big Love. I’ve been cooking with gluten free pasta from Italy.

Anyway, this week I have been battling a horrible cold. My entire head feels like a balloon is inside ready to swell and pop. So I’ve been eating a lot of soup. Lentil soup. Pumpkin bisque soup. Chicken soup. Tonight I could eat no more soup. That means pasta. And I decided rather than oil and cheese, or marinara sauce, I’d try and make an Alfredo sauce.

Here’s what you need –

  • 4 ounces heavy cream (Trader Joe’s has a shelf stable heavy cream. It’s pretty awesome)
  • 1/2 cup shredded Romano cheese
  • 2 ounces crumbled goat cheese
  • 1 tbsp olive oil
  • 1 6 ounce jar of roasted red peppers, diced (more if you like, or have)
  • 1/4 tsp garlic powder
  • 1/4 tsp pepper

In a saucepan, heat olive oil and add the roasted red peppers. Stir quickly, then add the heavy cream and lower heat to barely a flame. Add the cheeses, garlic powder and pepper. Let melt together, stirring occasionally for 10 minutes or so. Toss with pasta and fresh vegetables.

comment 0

Roast

I’m back! The holidays were a whirlwind of excitement, travel and TONS and TONS of food. January 1 I started counting calories again. January 4 and January 5 were completely shot as I filled my face with food. Oops.

I made the best roast ever for our Christmas Eve dinner. This roast was a project. Not because it’s a difficult recipe, but because we could not find said roast in the store for a reasonable price. Bon Appetit recommended a three pound center cut tenderloin roast. The first place we went to find the roast it was $40 PER POUND. The next place, it was $20 per pound. Finally, god bless Market Basket, we found it for $15 a pound. And thankfully my mom went into Market Basket to buy it because I have a serious phobia when it comes to that store. So. many. people. If the blog “People of Market Basket” doesn’t exist yet, someone should start it. There are some serious characters.

Okay, so anyway, we went all out and chopped down our own herbs at the farm’s green house, but no need to go all out. Here’s the original recipe and here’s what you need:

  • 3 garlic cloves, chopped
  • 1 tbsp fresh thyme
  • 2 1/2 tsp salt
  • 1 1/2 tsp black pepper
  • 1 1/2 tsp freshly ground pink peppercorns
  • 1 3-pound center-cut beef tenderloin at room temperature
  • 1 bunch fresh rosemary
  • 1 tbsp olive oil
  • 1 tbsp unsalted butter
The morning of, combine the garlic, thyme, salt, black pepper and pink pepper. Remove the roast from its packaging and have a few pieces of plastic wrap ready on the table (you’ll be rewrapping the roast, so cut accordingly).
Rinse the roast, pat dry and then rub the garlic mixture on all sides. Rewrap in plastic wrap and pop into the fridge to soak in the flavors for a few hours. One hour before you plan to begin cooking, remove roast from the fridge and let come down to room temperature. This is critical.
Preheat the oven to 400F. Scatter rosemary on the bottom of your roasting pan. Melt the butter and olive oil together in a cast iron skillet and sear the roast on all sides. I did this on an electric stove, and it took about 10 minutes. This most likely takes less time on a gas stove.
Transfer the meat to the pan and roast for about 30 minutes or until your meat thermometer registers 125 for a medium-rare.
Let the roast sit for 15 minutes before slicing.
NOTE – for some reason, 140 produced a very rare roast, so I sliced it up, popped it onto a cookie sheet, and let cook for another 5 minutes in the oven. It was perfect.
comment 0

Paleo NUT FREE Gingerbread Cookies

Guys. Seriously. There is no recipe out there for paleo nut free gingerbread cookies. I was in shock. Really?! No one has ever done this?! Someone must have. But I couldn’t find their recipe. And I barely have gluten free baking down, let alone grain free baking. It’s a whole new world.

BUT it’s possible and the results are pretty yummy if I do say so myself! Plus, this would be a great recipe to do with kids because the dough doesn’t fall apart easily. So here’s what you need:

  • 1 cup sunflower seeds (unsalted, dry roasted)
  • 1 cup pepitas
  • 1 cup coconut flour
  • 3/4 tsp cinnamon
  • 1/2 tsp nutmeg
  • 1/2 tsp salt
  • 1/2 tsp baking soda
  • 1/2 cup molasses
  • 1/4 cup maple syrup
  • 3 Tbsp coconut oil

Preheat oven to 350F. In a food processor, pulse your sunflower seeds into a coarse flour. Transfer to a large mixing bowl. Next, pulse your peptias into a coarse flour. Transfer to the same bowl.

Add the coconut flour, cinnamon, nutmeg, salt and baking soda. Stir to combine.

On the stove, heat 1/2 cup of molasses until it boils. Remove from the heat and add the maple syrup and coconut oil. Stir until everything is combined (and melted if your coconut oil wasn’t already melted beforehand).

Pour wet ingredients into dry and mix with a wooden spoon.

In batches, roll dough out between parchment paper until 1/4″ thick. Use cookie cutters to cut out shapes. Transfer to a cookie sheet lined with parchment paper. Bake for 8 – 10 minutes.

Let cool and decorate! I used honey, coconut shreds, dark chocolate and raisins, but any combination of dried fruit would work too.

comment 1

Beef Stew Inspired Risotto

I love risotto. From the first time I laid eyes on it when I was 10 years old until today. It’s a comfort food. You can give it almost any flavor profile, and pack it full of veggies. I’ve made everything from butternut squash risotto to bacon apple risotto to shrimp and chicken and more. The one thing I have stayed far, far away from adding to risotto is beef. I don’t know why, it just seems weird to me.

But I take that back. We had leftover roast in the fridge, a lot of carrots and plenty of beef stock. It wasn’t something I would normally associate with this creamy rice dish, but then again, where’s the adventure in cooking if you don’t try it?

Furthermore, yesterday I came across a recipe on how to make risotto in the oven (i.e. less stirring!).

Here’s what you need:

  • 1 dutch oven (I used a 3.5 quart)
  • 2 tbsp olive oil
  • 1 medium onion, chopped
  • 1 – 2 cloves of garlic, minced
  • 1/4 tsp thyme
  • 4 – 5 medium carrots, pealed and cut width wise
  • 1 1/2 cups of arborio rice
  • 1/2 cup red wine
  • 4 cups beef broth
  • 1 lb stew beef or roast, already cooked and cut into 1/2″ cubes

Preheat the oven to 400 F. Heat the dutch oven on the stove on medium, add your oil, then your onions. Cook until translucent, about 4 – 5 minutes. Add the carrots, and cook for another minute. Add in the thyme and garlic and stir for another minute until fragrant. Add in the rice, cook for another minute until it is coated.

Pour in the 4 cups of beef broth and let come to a boil, stirring occasionally. Once at a boil, put a lid on the dutch oven, and transfer it to the oven for 20 minutes. While this is cooking, cut up your meat. I used leftover roast. You could use stew beef already prepared, or you could quickly grill some steak and chop that up. Whatever is easiest for you.

Fifteen minutes in, add the beef and the wine. Cover and place back into the oven for the remaining five minutes.

Let sit for 5 – 10 minutes before serving.


comment 0

Pumpkin Pesto

Thanksgiving is over, work travel is over, so I’m back! The other night I came home from work exhausted (the 90 minute drive home might have had something to do with this). I scrapped all plans of going to yoga and decided to settle in for the night. Living with two people who are constant carnivores, I wanted to enjoy something less meaty. What I came up with was one of those grab things out of your fridge and make osmething. This just happened to be a really good recipe that resulted.

Here’s what you need:

  • 1 – 2 cups dry pasta (I used about 1 1/2 cups and that fed two of us with a leftover portion)
  • 2 tbsp unsalted butter
  • 8 sage leaves, torn into smaller pieces
  • 1/2 cup of pumpkin puree

Boil water for your pasta and cook according to manufacturer instructions. I used Tinkyada. Once you put your pasta into the boiling water, start the pumpkin pesto.

Heat a medium saucepan on the stove on high. Drop in the butter, then lower the heat to low, and let the butter brown. This takes about 5 minutes and you’ll need to shake the pan occasionally to move the butter around. Add your sage leaves and let cook for an additional minute. Dump in your pumpkin and stir to combine with the butter. At this point your pasta should be done.

Drain the pasta and toss into the pan with the pumpkin pesto. Stir to coat evenly. Grate over some Romano cheese and enjoy!

(Please forgive my picture. I ate it all before I could snap a decent one!)

comment 0

The Best Stuffed Chicken Recipe in the World

I’m not exaggerating. I wish I took a picture of this chicken, but I didn’t. I made it for a friend in their kitchen. We ate a whole block of brie before dinner and we STILL polished our plates. This chicken was that good.

I’m not going to beat around the bush anymore. Here’s what you need:

  • 2 boneless, skinless chicken breasts, weighing about 8 ounces each
  • 1/4 cup crumbled goat cheese
  • 1/2 tbsp herbs de Provence
  • 2 shallots, roughly chopped
  • 1 tbsp olive oil
  • 6 – 7 dried figs, cut up small
  • 1/3 cup + 1/4 cup Sweet Shiraz (or Port if you can’t find this)

Preheat your oven for 375 F. On the stove, turn heat up to medium high and add your olive oil and shallots to a medium sized frying pan. Cook for a few minutes, turning down the heat if the shallots begin to brown. Add your figs, a sprinkle of salt and pepper and stir. Let cook for a few minutes until caramelized. Add 1/3 cup of wine and cook for another minute or two until some of the wine has evaporated and you have more of a syrupy sauce.  Remove from heat.

Slit the chicken breasts in half, keeping one long end intact (so it opens like a book or looks like a butterfly). Sprinkle half of the goat cheese on one half of the breast, and the remainder on the other chicken breast. Sprinkle half the herbs de Provence on one chicken breast, and the other half on the other. Spoon over the fig and shallot filling onto each breast and shut the “book” so that the filling is in between two pieces of chicken. Transfer to a baking dish and pop in the oven for 25 minutes.

When the chicken is done, let sit for five minutes. Meanwhile, pour the remainder of the wine into the pan and deglaze. Simmer until you have 2 tbsp and remove from the heat. Add a pat of butter (optional) and swirl in. Spoon wine sauce over the chicken breasts.


comment 0

Nut free “Peanut” Stir Fry


“What do you use instead of soy sauce?”

Ah, yes, the typical, if you can’t have gluten, what do you use question. Well, if you’re looking for an almost equivalent, go for gluten free tamari. But I also find that balsamic vinegar makes a great substitute, especially in stir fry sauces. It adds a new level of flavor, a tang, plus it’s not overly salty.

I’m a big fan of peanut sauce stir fry (check out my blog post here for the recipe), but tonight I was given a new challenge: make a gluten free, grain free, sugar free and nut free peanut sauce. Challenge accepted.

Not only did I succeed in making a nut free peanut sauce, it was delicious and had wonderful tones that would make you think you it was made with its namesake. Here’s what you need:

  • 1/4 cup raw pepitas
  • 2 tbsp raw unsalted sunflower seeds
  • 1 tbsp sesame seeds
  • 2 tsp chili sesame seed oil (or 2 tsp of sesame seed oil and 1/4 tsp of red pepper flakes)
  • 1 clove of garlic
  • 2 – 3 tbsp grape-seed oil
  • 2 – 4 tbsp water or vegetable broth
  • 1 tbsp balsamic vinegar
  • 1 clementine or 1 lime, juiced

Chop up all of your stir fry vegetables and meat. I used chicken, asparagus, broccoli, zucchini, onion, carrots and celery but really, any combination works. Shrimp, beef, pork, etc. Now before you go ahead and dirty that pan by adding your protein and such, turn the heat on medium high and pan roast your pepitas, sunflower seeds and sesame seeds. This should take 1 – 2 minutes and the sesame seeds will start popping. Make sure your constantly shaking the pan or stirring the seeds so they don’t burn. Transfer seeds to a bowl to cool a bit. Add some grape-seed oil to the already heated up pan and start cooking your meat of choice. After a few minutes, add 2 – 4 tbsp of water. After about two minutes, add in your vegetables and turn the heat to low medium. Let this continue cooking, stirring occasionally while you tackle the sauce.

Pour the roasted seeds into your food processor (or blender if you don’t have one). Add in the rest of the ingredients I listed out above and pulse until the sauce is mostly smooth (you’ll have a few chunks, but this is okay). Add the sauce to the stir fry and let soak in for a few minutes before removing from the heat.

Serve on top of rice or for a grain free option, “riced” cauliflower. Top with sesame seeds and cilantro.

comment 0

Gluten Free Apple Fritters

I have never been a big donut person, but when you take away the ability to eat something, like a donut, it’s all you seem to want. Does anyone else notice this?

When it comes to baking gluten free, I am SUPER wary of making things that could fall apart. Like donuts fried in oil. Let’s be honest, gluten free batters just want to crumble apart. Even when they’re wet and uncooked. But I decided to give Gluten Free on a Shoestring’s ‘Apple Fritter‘ recipe a whirl.

Here’s what you need –

  • 1 cup Better Batter (if you use another GF flour, add a 1/2 tsp of xanthan gum. If you’re making these with regular flour, just substitute Better Batter cup for cup)
  • 1¼ tsp baking powder
  • 3 tbsp sugar
  • 1 tsp ground cinnamon
  • ½ tsp  salt
  • 1 egg
  • ½ cup milk
  • 2 tbsp unsalted butter, melted and cooled
  • 1 tsp  vanilla extract
  • 2 medium-sized apples
  • Canola oil (amount is dependent on the size of your pan)

Combine the Better Batter, baking powder, sugar, cinnamon and salt in a bowl. (I threw this into my KitchenAid). Add the egg, milk butter and vanilla extra and mix until well combined and there are no lumps.

Fill a large sauce pan with oil – about 1-inch – and turn on high heat. Place a candy thermometer in to track the temperature. We’re looking for 375F.

Peal your apples, then chop up small, so they’re in 1/4-inch chunks. Add to the dough mixtures and fold in until combined. Set aside a plate layered with paper towels. When your oil is up to to temperature, drop in large spoonfuls of the dough and let cook for one minute. Flip over and let cook on the other side for one minute. Remove and place on the paper towel plate. Repeat with the rest of the dough, and remember to keep an eye on the oil temperature, it sometimes can go too high or too low.

Sprinkle powdered sugar or eat plain. Also please excuse this photo, it doesn’t do the finished product any justice, but this was taken the next day, with the leftovers, on my phone.

comment 0

Blueberry Cinnamon Pork Chop

I have to be honest, I went almost two whole weeks living on rice pasta (in a variety of formats  – mac & cheese, with one pot tomato sauce, in a casserole), gluten free pizza and b.good. This does not lead to very creative cooking measures and as such, I haven’t had much to blog about lately. Until last night.

It’s cold in Boston now and I spent the earlier part of the day outside, so my afternoon was dedicated to warming up and catching up on blogs. And you know how blog reading goes. Sometimes you just keep going back and back and back in someone’s blog posts until you’re in like May and it’s been many months and you can’t believe you missed a KEY recipe. (Or maybe this is just me) Anyway, I had a few pork chops in the fridge and I could cook them all boring, as usual, but then I stumbled on PaleOMG’s “Blackberry Glazed Grilled Pork Chops.” Hello. I modified a bit – mostly because I have no gas for my grill, nor blackberries, but it was to die for.

Here’s what you need –

  • 3 – 4 1-inch thick pork chops
  • 1 tsp cinnamon
  • 1/2 tsp ground thyme
  • 1/4 tsp salt
  • 1/4 tsp pepper
  • 1/3 cup of frozen or fresh blueberries
  • 1/4 cup balsamic vinegar
  • pinch of salt

Preheat your oven to 350F.

Combine the cinnamon, thyme, salt and pepper on a plate. Rinse pork chops and pat dry. Coat with cinnamon stuff on each side. Meanwhile, in a small sauce pan, add the blueberries, vinegar, salt and about 1 – 2 tbsp of water. Set on medium to high heat and let come to a boil, then bring the heat down to medium low.

Heat up a cast iron skillet on the stove on high. Once hot, bring down to medium heat and place your pork chops in it. While you’re establishing your crust on the chops, remove the blueberry sauce from the stove. It should have had about 5 minutes to boil up and simmer. Strain the sauce into a small bowl and reserve the blueberries.

Flip your chops after about 1 – 2 minutes, and using a pastry brush, coat the cooked side in blueberry sauce. Let cook for another 1 – 2 minutes, then flip and repeat with the blueberry sauce. Bring your heat down to medium low. Continue to flip and cook for one minute on each side while spreading the blueberry sauce over it. Remove from the heat, dump the rest of the sauce on top of the chops and then pop them in the oven for 5 minutes. (Must do this in a cast iron skillet if you want to put it from pan to oven)

While this was cooking, I popped a sweet potato in the microwave, and reheated some of Trader Joe’s frozen grilled asparagus.

Plate by spooning some of the blueberries on top of the chop, then drizzle juice from the pans over it. Nom.